Welcome to the Google Earth Interactive Tour of ELEGY FOR A STOLEN LAND
Instructions
Quick Start:
1. Make sure you have the latest version of Google Earth already installed on your computer.
2. Download a copy of the tour (.kmz file) from Here
3. Click on that kmz file to launch Google Earth
4. At the bottom of the Places menu in the left hand pane of the Google Earth interface you will find the tour in the Temporary Places folder.
5. Inside that, in the Regular User Tour the Sidebar on the left, open the folder and activate each step in succession.
Detailed Instructions: You can navigate through the site via the Places on the Sidebar.
Execute steps 1- 4 in the Quick Start instructions immediately above.
For those unfamiliar with the Google Earth interface, the Sidebar presents a list of Places in an order I have programmed to help you make sense of the experience.
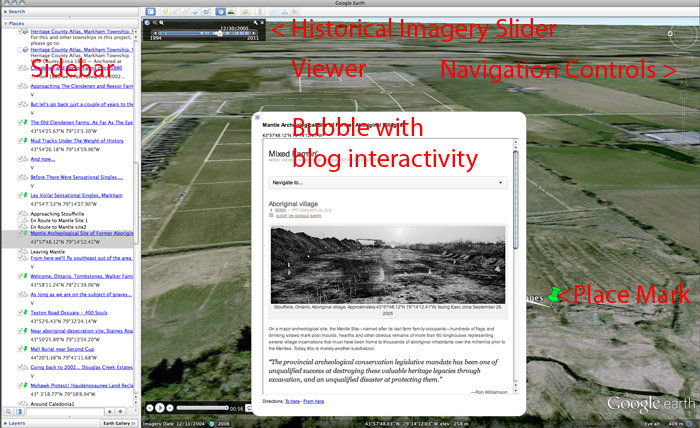
(Please see Figure 1: Overview of Interface, below)
It is not necessary you follow this order but for people new to the interface, it may be helpful to stick to that order for now.

Figure 1: Overview of Interface
Most of those Places are, or lead to, potential stopping points where you may interact with this virtual environment, anything from moving around the location on your own to responding with your feedback to the rich media that you find there .
In addition to latitude, longitude and altitude, Google Earth provides a fourth dimension, allowing you to move backwards and forwards in time through a roughly 10 year span using the Historical Imagery Slider, upper left corner of the Viewer. (see Figure 1 above)
In many Places on the tour, aside from my photograph, in the Viewer you can see aerial photographs of what existed before my photograph, around the time of my photograph and several years after it.
Settings & Layers:
As this is in a public gallery and as there is no way to lock the Google Earth Browser interface, it may be helpful to take a few seconds to verify the settings for the Google Earth interface, before you begin your tour..
1. In order to make use of the time-travel feature, please ensure that “Historical Imagery” is selected in the drop-down View menu at the top of the screen which will also be verified by the presence of the semi-transparent historical imagery slider in the upper left corner of the viewer. (Please see Figure 2 below).

Figure 2: Settings
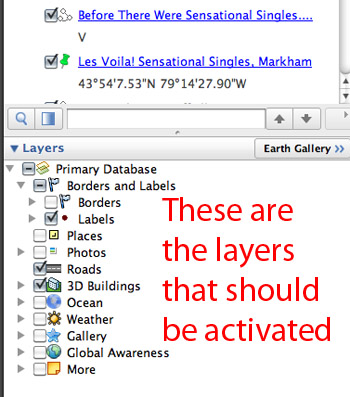
2. Additionally, before you take your tour, it may be wise to go to the bottom of the Sidebar and click the Layers menu to verify that the correct layers are activated. (With too many layers activated ,the Viewer can become overwhelmingly cluttered.)
Please check the following boxes are activated (as per Figure 3) and no more or the Viewer will get overloaded with information.

Figure 3: Layers
The Pop-Up Bubbles:
You are reading these instructions in a Bubble right now.
This is a key part of the fun and discovery.
The bubbles can be activated in several ways:
(a) In the semi automated version of this tour, clicking the next stage of the tour will activate a bubble at the end of each step, leaving that bubble open to allow you as much time as you wish to explore what you find there and contribute feedback if you wish.
(b) In the manual version of the tour, many of the underlined blue links in the Sidebar will open a Bubble.
(c) At any point, clicking the Place Mark (green push-pin) in the Viewer will activate a Bubble.
However to in order avoid having the Bubbles behaviour becoming irritating while moving through your tour, it may be helpful to close the Bubble by clicking the little blue close box in the upper left corner of that Bubble before you move on the next Place on your tour.
Just as the Google Earth aerial photography is live to the internet and may be updating in real time, please note also that these Bubbles are live to the internet, and depending on the speed of the connection, it may take a few seconds for the web page to populate the Bubble. Please be patient.
Inside the Bubbles:
Most of these links will open a Bubble with one of the photographs from Elegy for a Stolen Land in the context of my blog. These blog pages are interactive (as most blog pages) enabling, if you wish, you to post comments on your experience of a given photograph or the project in general.
Within the Bubble you can scroll through the content of the blog page to the comment area.
Please note: Comments will not appear immediately but will be filtered for SPAM and profanity, but all critical comments (pro or con) will be published. Please feel free to offer suggestions to make this experience more friendly. Within the built-in limits of the Google interface, as the site evolves, I will try to incorporate what improvements I can.
One other thing: in my blog interface, near the top is a “Navigate to…” drop-down menu to navigate around my blog as if you were using a regular internet browser on a computer, tablet or smartphone. In most cases you would probably NOT want to use that menu with in the Google Earth environment, but rather when you are visiting my blog through a regular web browser.
Indeed, this whole project can be accessed from any regular computer upon which the free Google Earth browser (recent versions 5-6 are required) is installed. My blog operates autonomously outside the Google Earth context and will have a link where you can access this tour to play in your own GE browser.
Different Versions of Tour
1. Regular User Tour: (Semi-automated for most people). Clicking on each sequential Place in Sidebar will navigate you automatically to the next Place where you can explore using the additional navigational tools as well as interact with the content in the Bubbles.
2. Advanced User Tour (Fully manual for Experienced Google Earth users): In this version each step of the tour is accessible and can be access manually in any order you choose. To navigate the sidebar, double-click in the space to the left of a given check box (NOT the checkbox and NOT the link) so that location is highlighted in yellow and you will “be flown” to the Place in question. Click the link when you get there and are ready to see what is waiting in the Bubble.
Once you get comfortable with the basic navigation there are additional controllers in the upper right corner of the Viewer window. Feel free to navigate around on your own, moving up and down in altitude, changing angles and moving back and forth in time using the Historical Imagery Slider.
You can always get back to the tour simply by double clicking to the left of a Place check box in the sidebar.
And you can always get back to these instructions by clicking on the “START HERE (Instructions)” link near the top of the list of places in the sidebar.
To help you get your bearings, we begin here, in Stratford (Sidebar 01-YOU ARE HERE-Stratford)
-Peter Sibbald

Recent Comments